Last fall we shared our trick for hanging affordable Ikea curtains so they look a lot more expensive than their $14 price tag per panel would suggest (across an entire house you can save thousands with that trick & these curtains alone!!). But since we were just replacing our old bedroom curtains when we wrote that post, we skipped the crucial step of actually hanging the curtain rods themselves. And since we just installed approximately one million curtains at the duplex (okay, 16 of them, but that’s a pretty notable amount to hang all at once) we wanted to share a new trick that we used to speed things up, keep everything looking level and equally spaced, and make it much easier and less overwhelming in general.
But first, let’s establish some quick curtain basics:
How HIGH Should You Hang Curtain Rods?
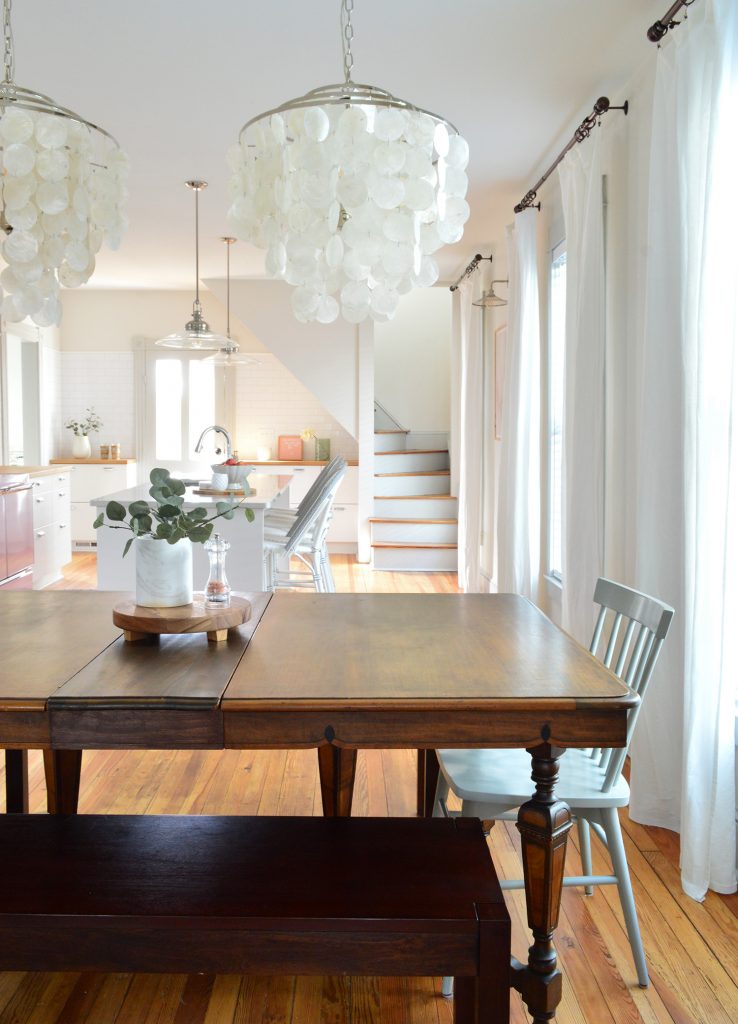
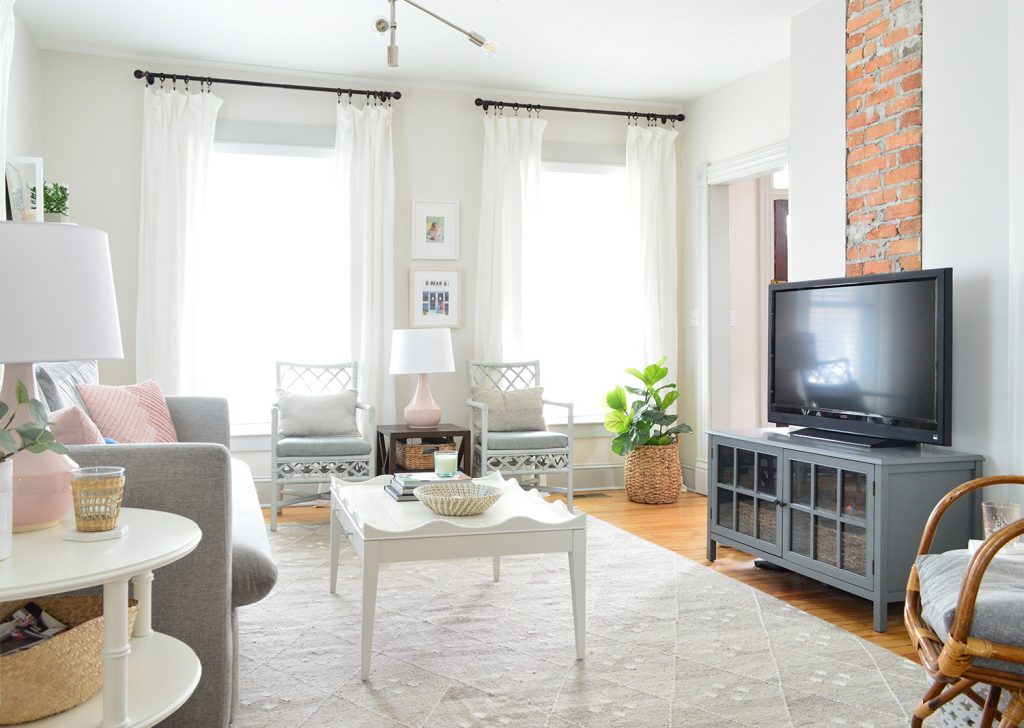
Like anything in decorating, there’s not a hard and fast rule for this, but most people agree that curtains look best when they’re hung (say it with me!) HIGH AND WIDE. As in, higher and wider than the window itself. This not only creates the illusion of a bigger, grander window, but it also makes your room feel taller and draws the eye up. This is a 9′ room below, and you can see how nice it is for the window trim to get to breathe a little, and the eye goes from floor to almost-ceiling thanks to those long white curtains and that highly hung rod.

Speaking of the floor, most experts say that your curtains should usually touch or nearly touch the floor itself. This is all personal preference (some like them to hover slightly above the ground, others love a dramatic pool of fabric at the bottom) but we typically like them to graze the floor ever so slightly – like below in our showhouse’s dining room. We find this helps keep them in place better (when they don’t quite touch they tend to just hang randomly, but when they graze the ground they ground themselves and stay put if that makes sense).
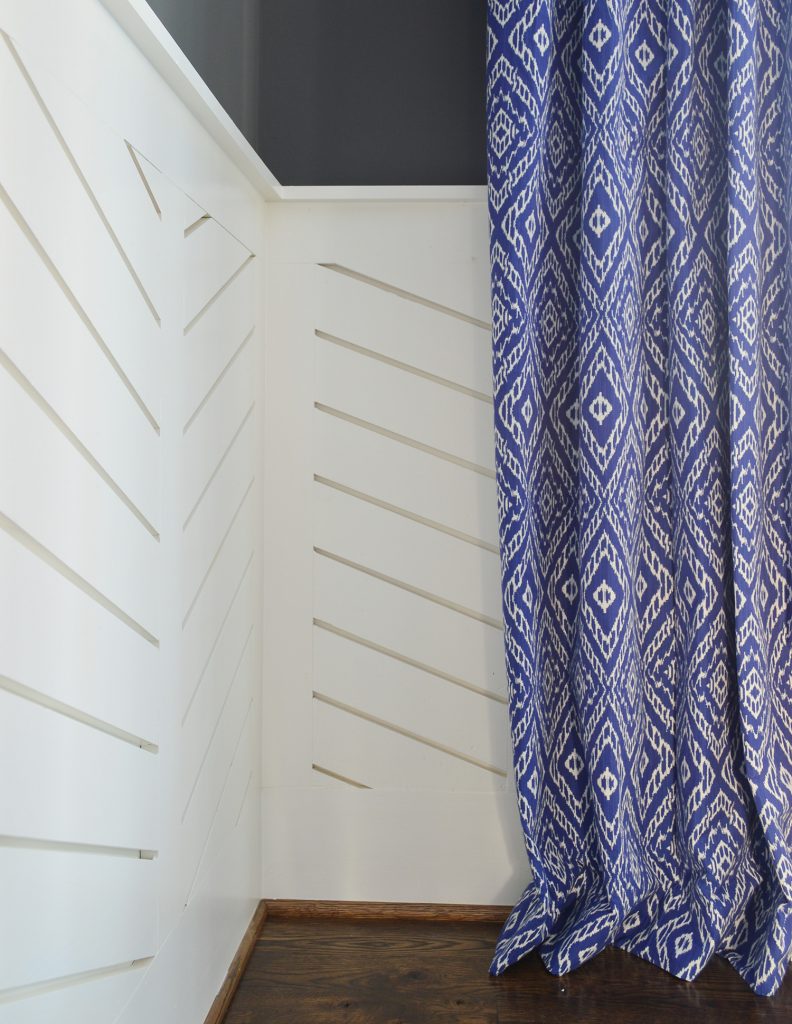
Having them just touch and not be extra long and pooled makes them easier to move for vacuuming and ours don’t get all dragged around and gross on the bottom since they’re not excessively long (bonus: remember these curtains are 100% washable! In fact one of the first steps of getting them is to wash them to preshrink them so whenever you wash them again later, they don’t shrink on ya and the rod is still in the right place – more on that here).

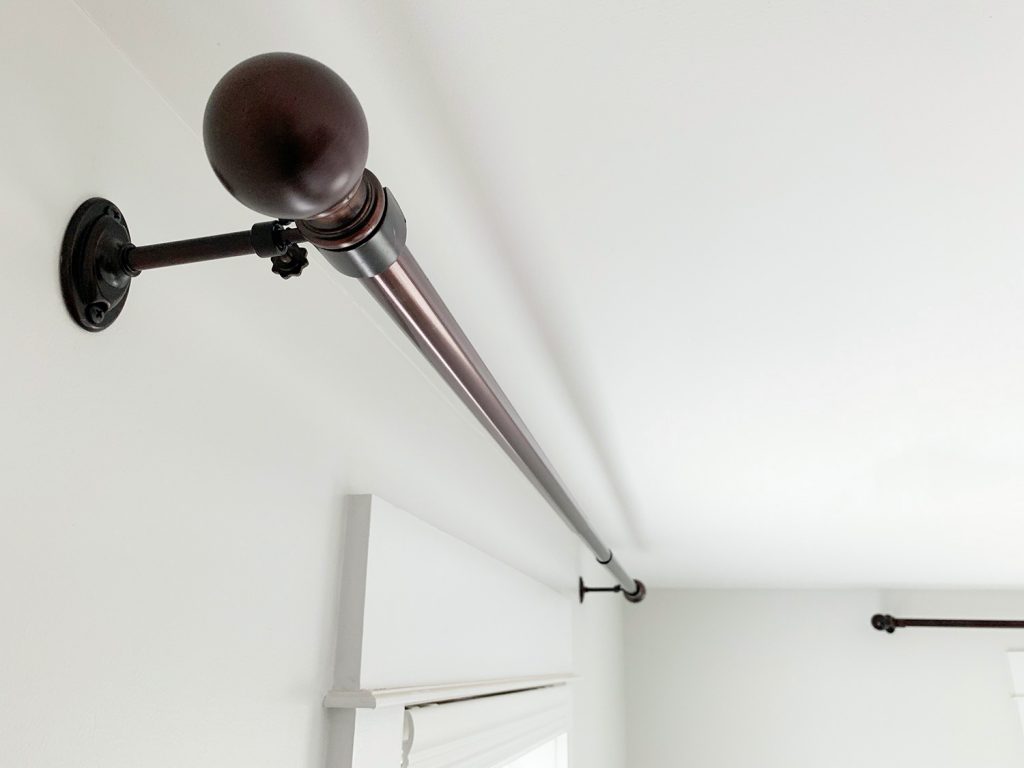
But back to the rod. The precise placement of yours depends on a few factors (ceiling height, curtain length, trim & molding style, etc) so I can’t give you a hard and fast measurement for where your rod should always go… but generally, we like to hang ours about 3-4″ below the ceiling or, if there’s crown molding, 3-4″ below the bottom edge of the crown.
This allows the curtain rod to “reside” fully (including finials) within the painted area between the window and the ceiling, which always looks SO NICE. But the important thing to note is that we’re hanging them in relation to the ceiling, not the window. It’s the assumption that your curtains need to relate to the window that causes a lot of people to hang their curtains too low. Heck we have seen rods drilled right into the window trim itself, which is just another way to make things feel really squat and cramped.
Remember, trim looks so nice when it’s allowed to breathe without any rods looming over it or being drilled right into it. That being said – sometimes the window trim is really close to the crown, and in that case we like going into the wall above the trim if possible – since the crown or the trim might look tortured with a rod sticking out. This is another picture from the showhouse we designed a few years back to demonstrate what we mean:
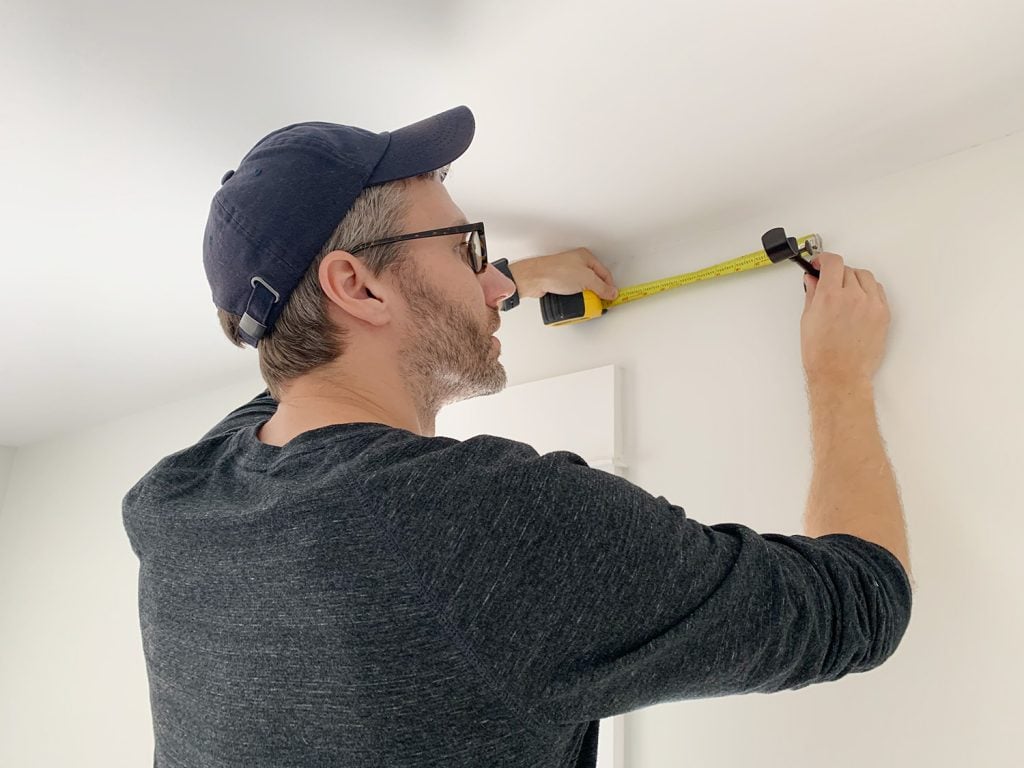
Your best bet is to have someone hold half of the rod up with one curtain panel attached (after you’ve washed, ironed, and done whatever else might change the height of your panel – except for hemming, that should happen once they’re hung so you can get the perfect length). If you step back and view it while someone holds it up for you, you’ll be able to decide what looks best to your eye – and using that 3-4″ below the ceiling or crown molding guideline can help.
Of course there are super tall cathedral ceilings, or rooms where the ceiling height slopes, etc – so this guideline probably works best when the ceilings are 10′ or lower without much of a slope. All super tall rooms or spaces with sloped ceilings are special cases – but again, looking with your eyeballs as someone holds half a rod with a panel on it can really help you visualize what looks best.

How WIDE Should You Hang Them?
This is another thing that’s influenced by a variety of factors, like the size of the window itself, what else is on the wall (especially if there are OTHER windows nearby), and how tight or loose you want your panels to look. Generally we like to place the rod hooks about 8-11″ from the outer edge of the window trim.
This gives us the loose, breezy curtains we like, while still allowing us to barely cover the window molding, which is what creates the illusion that the windows are wider than they really are. In other words: THE CURTAIN PANELS ARE HANGING IN FRONT OF THE WALL NEXT TO THE WINDOW – NOT IN FRONT OF THE WINDOW (which makes it look smaller and blocks light). Sorry for shouting, but it makes such an insane difference when people stop hanging their curtain panels right in front of their windows.
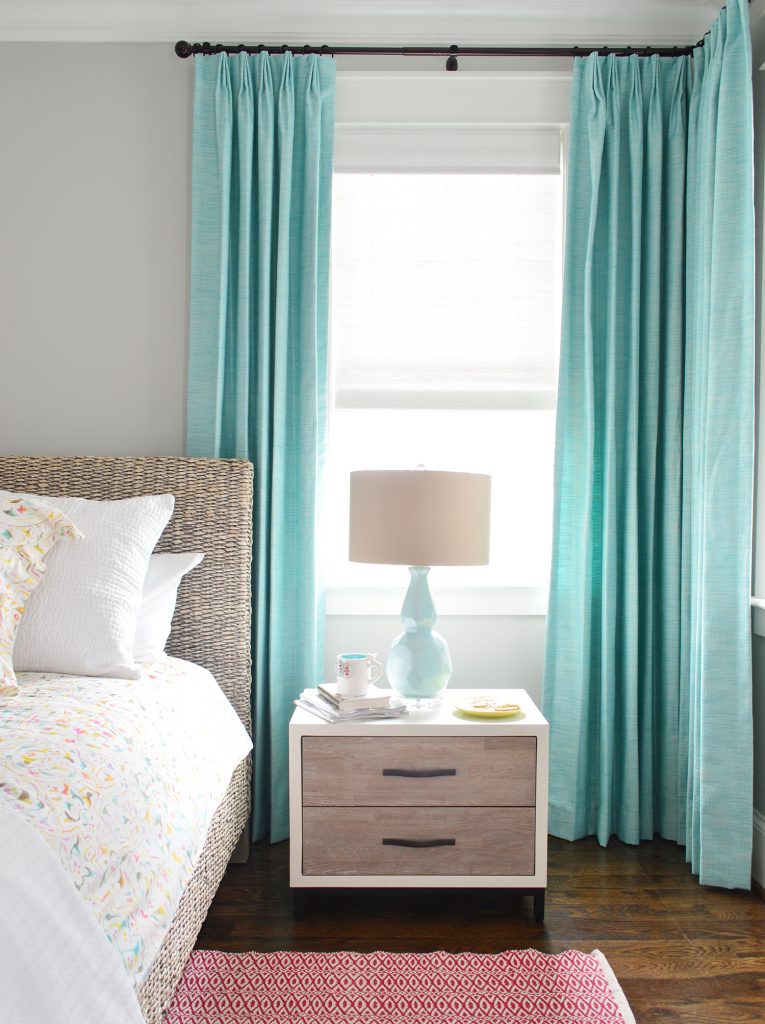
We might hang the rods less wide if there are windows that are closer together than usual (like in our bedroom below – where they’re just a few feet apart, plus that one window on the right is very close to the right wall). We don’t want them looking cramped so in the instance below we didn’t go as wide with the rods – but we definitely made it so that as much of the curtain panels as possible could hang in front of the walls around the windows as opposed to blocking the windows themselves.

Conversely, we might hang them even wider than 8-11″ beyond the outer edge of the window trim if we’re trying to fill a large wall space. We might even hang the rod wider on one side than the other if we’re trying to make a window look less off-center (more on that here – it can make all the difference!). So it really is flexible.
Ok, But Now For Our Curtain Rod Trick That’ll Save You Time (On Video)
The reason for all that mumbo jumbo is because knowing the width (your desired distance from the window trim) and height (your desired distance from the ceiling) is what makes this easy trick possible. John demonstrates it all in this video below (also watch for my super cool footwear cameo). There are more photos after the video for those who can’t watch right now, but I’d strongly recommend coming back to view it when you can – things are so much easier to “get” when you see them in action on video – and this skill is handy to have forevermore.
NOTE: If you’re viewing this in a feed reader, you may need to click through to see the video. You can also watch it here on YouTube.
Step 1: Determine Your Measurements
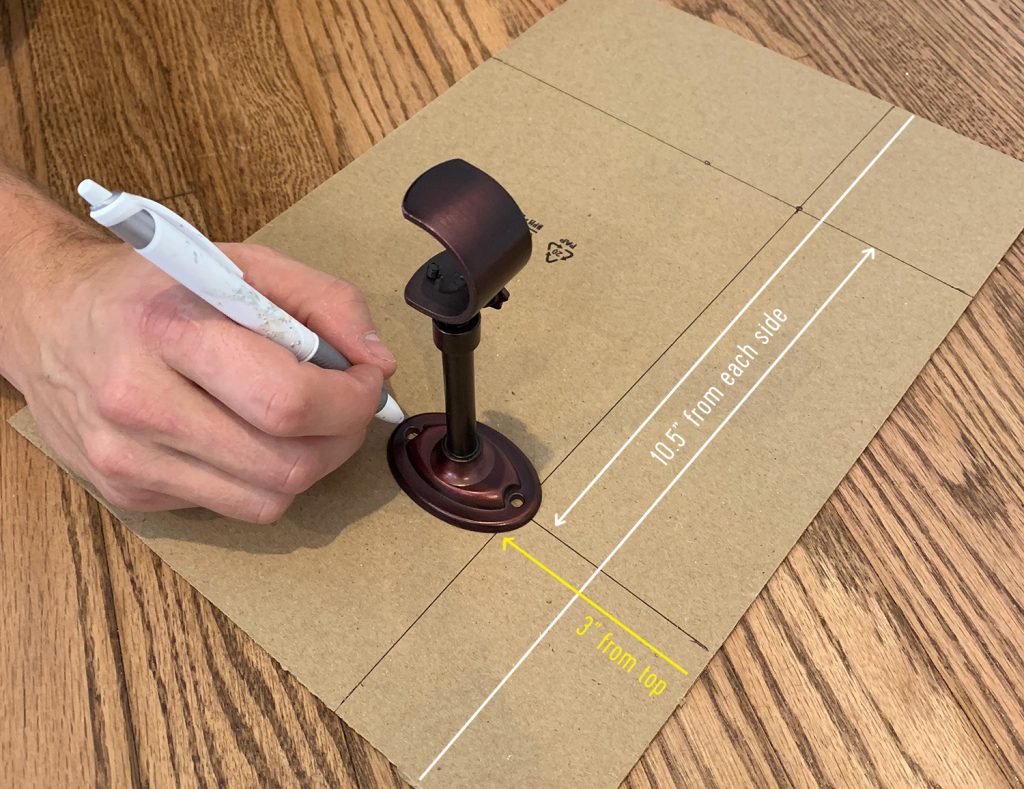
John and I determined that for the duplex we wanted to place our curtain rods 10.5″ from the outside of the window trim (weirdly specific, I know) and 3″ down from the ceiling. I should note that these are our measurements to the screws (the top screw, to be exact) since we find it easiest to work with the measurements of where you’ll actually need to drill. Watch as John models exactly what I mean below:
Step 2: Make Your Template
We used a scrap piece of cardboard to make our template – marking 10.5″ from each side and 3″ down from the top. This was actually the cardboard that came in the curtain package, so you might have something like it on hand already! Once we marked our lines (you’ll see them labeled below), we lined up the curtain rod hook and marked the two screw holes on BOTH 10.5″ marks.
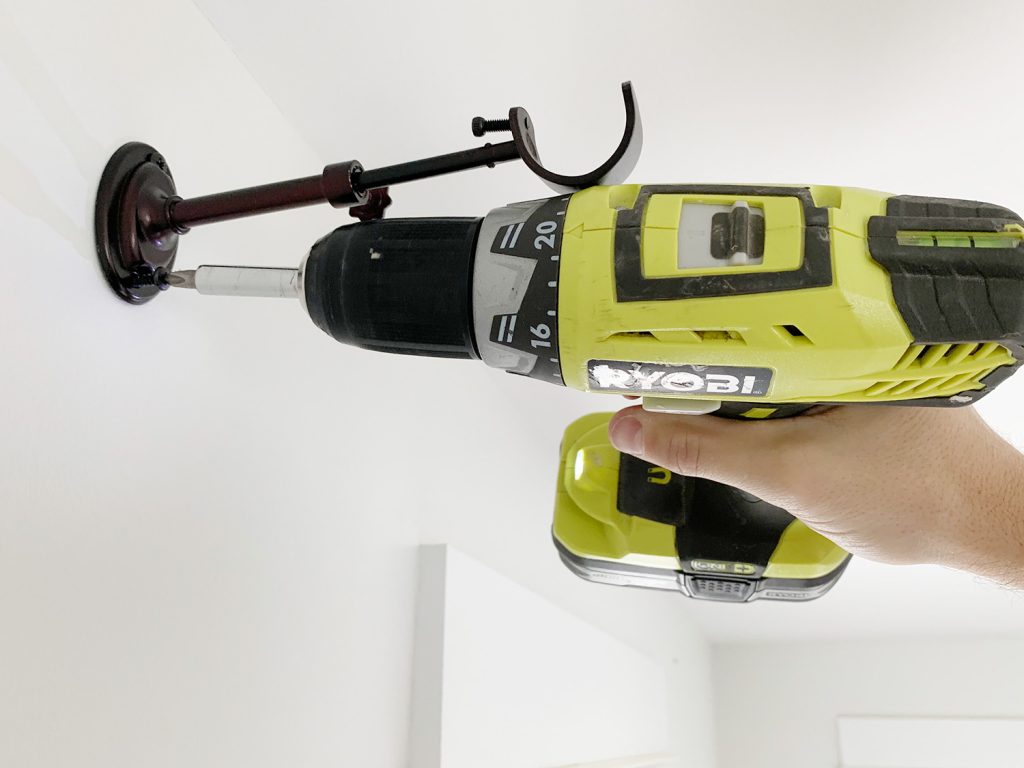
3. Drill Pilot Holes
You can pre-poke holes along these two marks, or you can just do it when you mark your first window. Load up your power drill with a small pilot hole bit (we used a 3/32″ one) and hold your template above your window with the edge lined up with the outside edge of the window trim and the top held flush to the ceiling. Then you can just drill small pilot holes through your two template marks.

Now, a note about keeping things level: CEILINGS AREN’T ALWAYS LEVEL (I’m looking at you, duplex) so using the ceiling as your guide might seem ill-advised. What if your ceiling is sloped and your curtains end up being sloped too?!
Well…. we have actually found that when you’re hanging the rod close to your ceiling, you actually want the rod to follow any slope in the ceiling exactly! It will be your eyes’ closest reference point for a straight line, so it will appear level even if it isn’t!! Meanwhile if you hang the curtain rod level but the ceiling slopes, the rod will actually look wrong! Or emphasize that the ceiling is wrong! So yeah, using the ceiling as your guide actually works well for wonky ceilings (again, the duplex has plenty of those – as does the pink house!).
4. Drill Larger Holes & Add Anchors
Next you’ll want to make your pilot holes on the other side the window using the other half of your template (this is why you marked 10.5″ from BOTH sides of the cardboard) – so you can use it as a template on both sides of each window. Assuming you don’t hit any studs, you’ll need to add anchors after making those pilot holes, so swap out your drill bit for the correct size that works with your anchors (the provided anchors for our rods needed a 3/16″ drill bit) and drill into each premade pilot hole to make larger holes that fit your anchors. Bonus – the template acts as a great way to catch drywall dust. John was very excited when he discovered this. Just look at the joy on his face.

With all of your anchor-ready holes drilled, gently tap in your anchors in with a hammer or mallet. As I passionately interject in the video, your anchor holes shouldn’t be too loose or the entire curtain rod will be rickety and won’t hold up. And you shouldn’t be able to push your anchors into the wall by hand or the holes are way too loose (which can cause your rod to sag or fall out of the wall). So using the correct drill bit size for your anchors is important. It should be indicated in your curtain rod’s instructions or on the box that your anchors came in.
5. Screw Your Hooks To The Wall
The rest is pretty straightforward – hammer in your anchors and secure your curtain rod hooks to the wall using the provided screws. I insisted on filming John as he demonstrated this part too, so if you want to see it in action you can catch it in the video above. Truly I think watching these things get done in real-time is worth a thousand blog pics & words – so check out the video whenever you have a second.
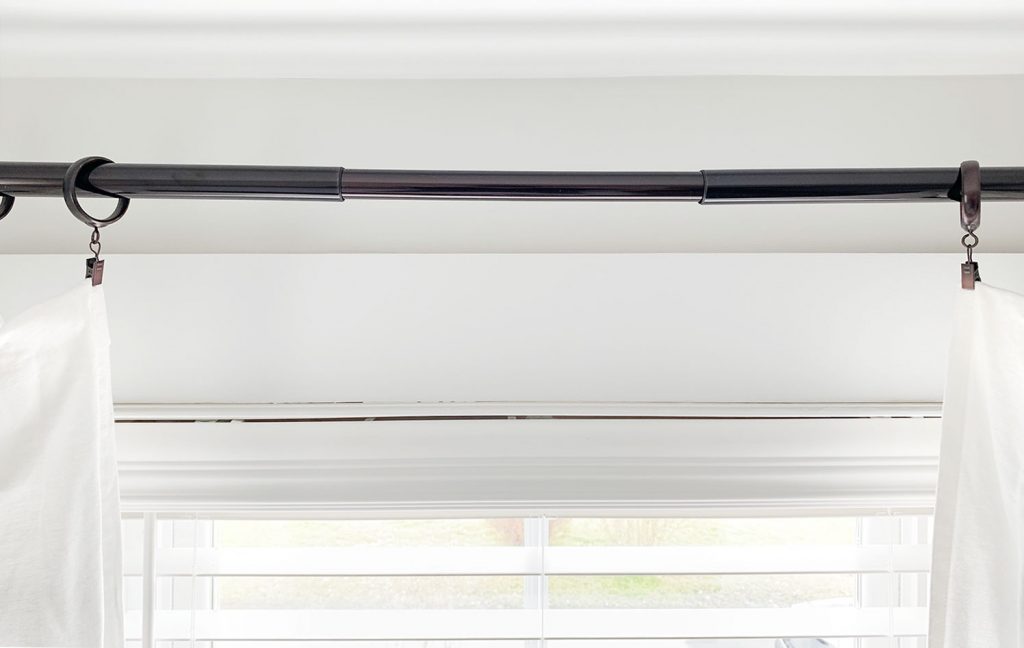
Bonus Tip: Correct Any Rod Sagging
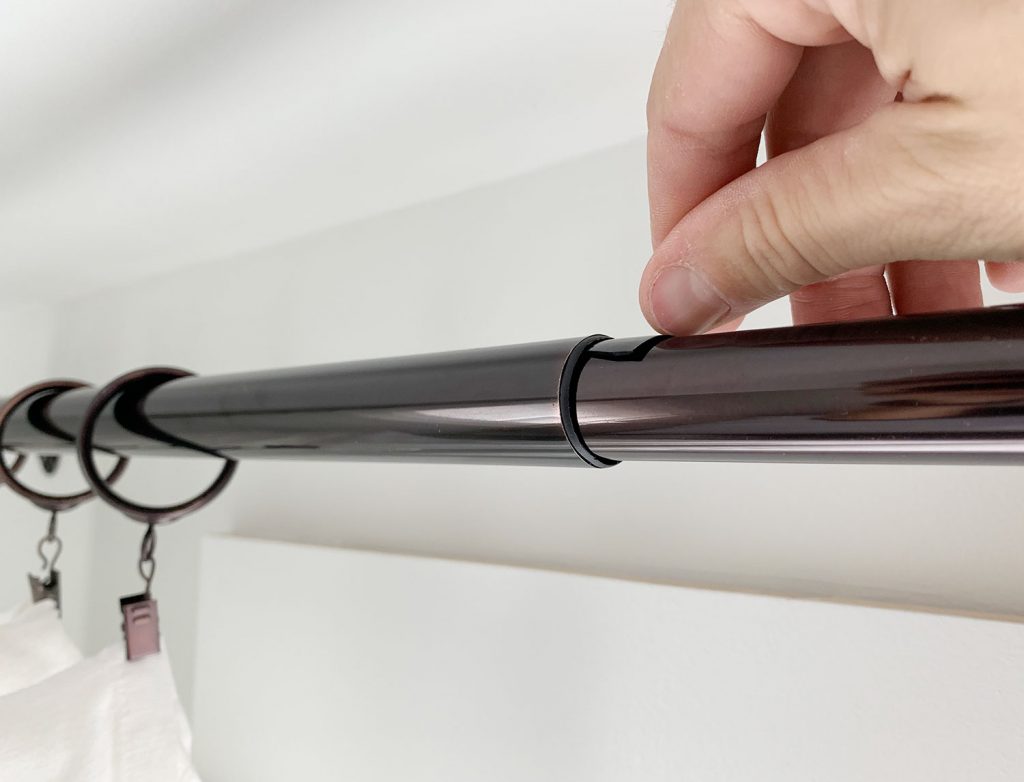
I’m gonna throw in another little hack here. Depending on your rod and how wide it is, you may notice that it appears to sag a little bit in the middle – especially where the smaller rod piece connects into the larger ones. Even if it’s super secure to the wall, it’s just that the skinnier middle rod looks like it’s sloping down to your eye – and I’m Type A to notice this and hate it. Your package may come with a third hook to hang in the center of your window if you reach a certain span with the rod, but often ours aren’t super wide so another support bracket would be overkill – so we rely on this weird little hack instead. Emphasis on WEIRD.
First, I take some of the protective plastic end caps that come on the curtain rods (they’re just packaging) and use a utility knife or scissors to cut off some small slices.
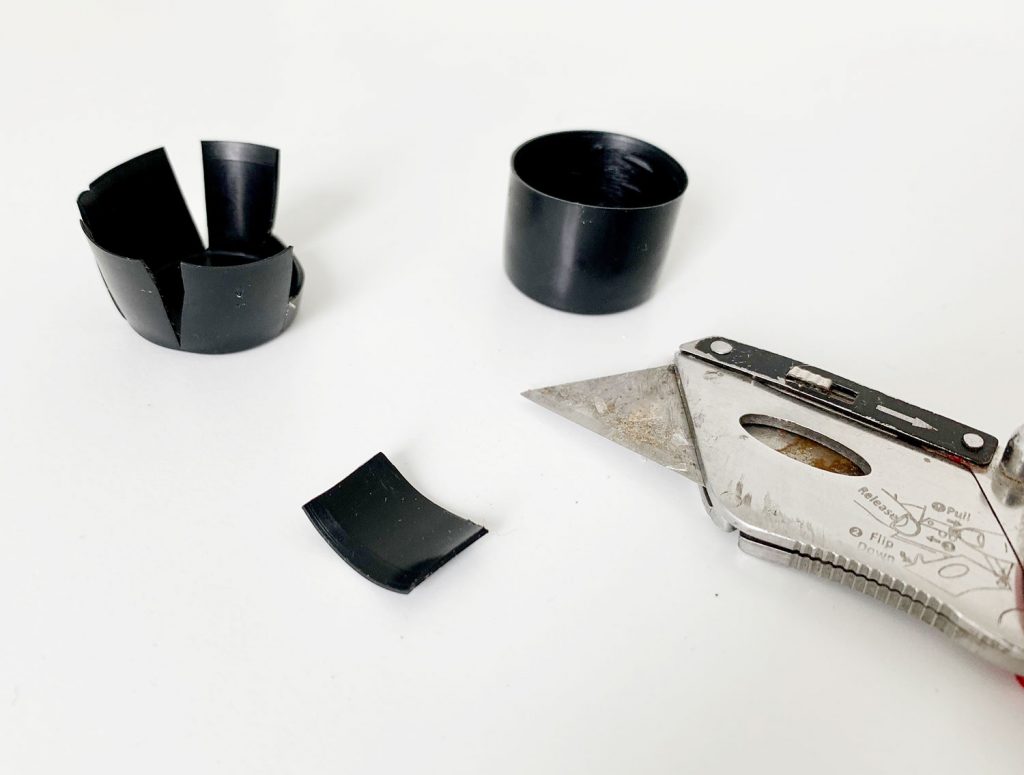
Then we tuck a piece inside the curtain rod at whatever connection point is sagging. It’s important that you put it on the TOP side of the rod and if you can’t slide it all the way in, just rotate your rod slightly so it’s hidden from view because no one is viewing your rod from the top. I know it’s REALLY weird, but it has been an easy way for us to correct a little bit of rod sag which makes my heart very happy. Just trust me – there is a noticeable difference and it no longer looks like it’s sad and droopy. Plus it’s free and I’m scrappy. So yeah. Five stars, would recommend.
That should pretty much do it for hanging the actual rod itself. And again, you can check out the post from last fall with our tips for actually preparing & hanging these inexpensive white curtains themselves. Between this post and that one you should be able to add curtains that are extra affordable (and washable!) along with tackling a whole bunch of windows at once, which might have felt overwhelming or nerve-wracking before. And you’ll definitely be faster with our little template trick too 😉

Oh, and the curtain rods we typically use are either these oil-rubbed bronze ones with these ring clips (ordering them online means you don’t have to run from store to store to find enough that all match) and sometimes we grab these Allen + Roth rods from Lowe’s in person if they have enough (their stock is often spotty).
When NOT To Use Curtains
“Wait, what if I have baseboard heaters or a built-in bench or something under my window?
I get this question a lot so I couldn’t end this post without touching on it. Some spots just aren’t great for a curtain panel. If it can’t hang all the way to the ground, sometimes it can make a room feel awkward to hang a not-quite-full-length curtain panel. There are definitely exceptions where cafe curtains can look really sweet, but we generally just go whole-hog (full curtains from floor to almost-ceiling) or skip curtains entirely in that spot. Take our dining room, for example, which has two heat registers right where curtains would hang, as well as a window that’s super close to the corner – so the panel would cover a lot of the window instead of having a wall to hang in front of:
We just skipped curtains in there and went with woven shades. The room still flows nicely with other rooms nearby, since we kept the woven shades consistent throughout the first floor of our house.
For example, these are the same shades in the kitchen (you can read more on our curtain reno here):
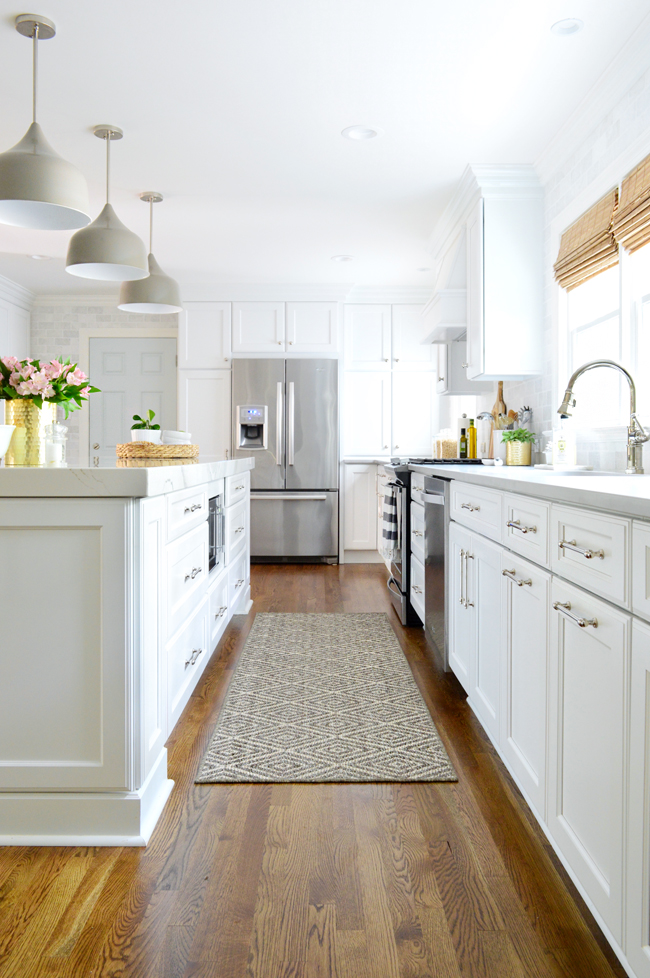
Clearly we couldn’t have long curtains hanging down from those kitchen windows since they’d hit the counter – so we just went with the nice warm texture that shades added.
And here’s the living room, which DID have room for nice long curtains (and we love the softness they add), so we did BOTH in here. The woven shades tie into the other spaces that also have them with or without curtains…

… like our home office, which also has both.
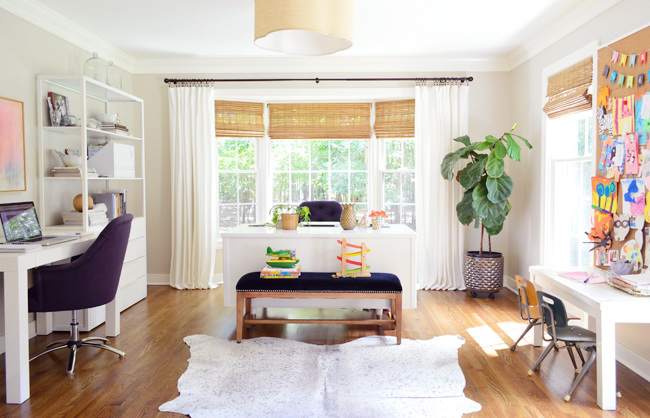
Our home office is actually a nice room to use as an example that you don’t have to treat all windows in the same room the exact same way. See how the windows along that right wall wouldn’t have room for curtain panels and the cork board (they’d basically cover the area where the cork board is, if we hung them wide so they didn’t entirely block the window?). So we just skipped them on that wall. Still looks fine having them around the bay window and not around those front windows, which also have heat registers that the curtains would have blocked on both sides. So it worked out just fine. It’s kinda like the bay window is the star, and the front windows are just supporting actors.

My closing lesson would be: general curtain rod guidelines and a trick to hang them more easily & quickly can be handy, but when it comes to the whole “what would look good in here” question, every single person might have a different challenge, layout, etc – so it’s really smart to have someone hold things up and step back and trust your eye. Try different heights. Stare at a picture of a certain window shade on your phone while standing in that room and looking at the window. Really try to picture things before you commit. Heck, you can even try photoshopping different solutions or printing out a photo of your room and drawing right over it (color blinds or curtains right onto the pic – this is the original photoshop – ha!).
And don’t forget to consider woven blinds or even a pretty patterned roman shade (like this) for certain spots where curtains wouldn’t quite work – and remind yourself that it’s ok to just take your time and figure things out as you go. So many of our rooms have had curtains or blind changes while we figure it out – so don’t beat yourself up about it if it takes a second try.
P.S. Wanna know where we got something in our house (or what color’s on the walls)? Click here. And we made the same masterlist of sources & paint colors for the beach house too for ya. And we’re pulling together a source lis for the duplex – it’s not very thorough yet, but a lot of the stuff we have there is on this page for ya – and there’s more to come.
*This post contains affiliate links*
The post A Quick & Easy Way To Hang Curtain Rods appeared first on Young House Love.
from RSSMix.com Mix ID 8294556 https://www.younghouselove.com/how-to-hang-curtain-rods-quickly/
